Creating a menu in WordPress is a simple and straightforward process that can be completed in just a few steps. Menus are an essential element of your website as they help visitors navigate through your site and find the content they’re looking for. In this blog post, we’ll be going over the steps you need to take to create a menu in WordPress, including how to add pages, posts, and custom links to your menu, as well as how to organize and arrange your menu items. Whether you’re a beginner or an experienced WordPress user, this guide will provide you with the information you need to create a professional and functional menu for your website.
In case you are not familiar with WordPress yet, feel free to watch this short video for a quick and easy introduction.

- Step 1: Log in to your WordPress Dashboard
- Step 2: Go to Appearance > Menus
- Step 3: Create a new menu
- Step 4: Add items to your menu
- Step 5: Organize your menu
- Step 6: Save your menu
- Step 7: Assign your menu to a location
- Troubleshooting Common Issues
- Creating a Mega Menu
- Step 1: Install a Mega Menu Plugin
- Step 2: Configure the Mega Menu
- Step 3: Add Content to the Mega Menu
- Step 4: Customize the Mega Menu
- Example of when to use a Mega Menu
- Conclusion
Step 1: Log in to your WordPress Dashboard
The first thing you’ll need to do is log in to your WordPress dashboard. This is where you’ll have access to all the tools you need to create and manage your website.

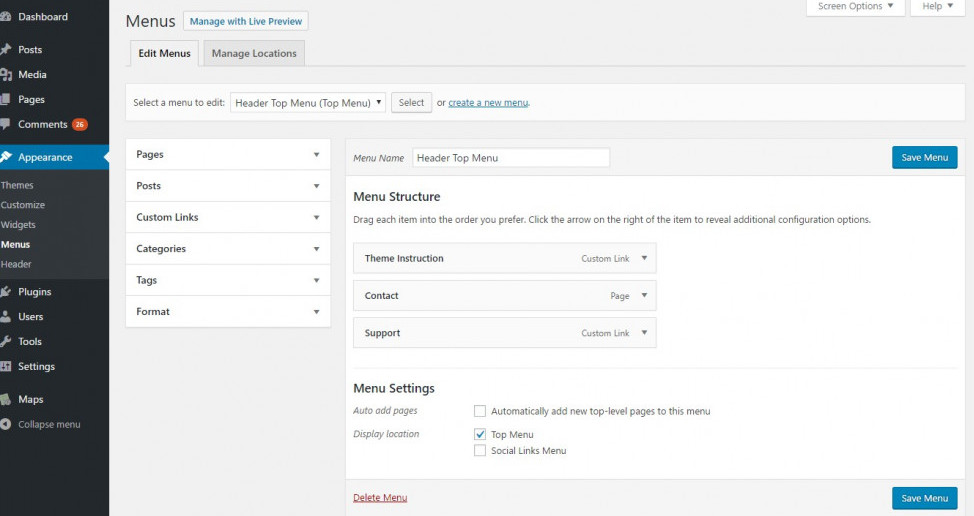
Step 2: Go to Appearance > Menus
Once you’re logged in, go to Appearance > Menus. This is where you’ll find the option to create a new menu.
Step 3: Create a new menu
Click on the “Create a new menu” button. You’ll be prompted to give your menu a name. Choose a name that makes sense for your website (ex: Main Menu, Top Navigation, etc.).
Step 4: Add items to your menu
Now it’s time to add items to your menu. You can add pages, posts, categories, and custom links to your menu. To add a page or post, simply check the box next to it and click the “Add to Menu” button. To add a category or custom link, fill out the appropriate fields and click the “Add to Menu” button.
Step 5: Organize your menu
Once you’ve added all the items you want to your menu, you can organize it by dragging and dropping the items into the order you want them to appear.

Step 6: Save your menu
When you’re satisfied with the structure of your menu, click the “Save Menu” button. Your new menu is now live on your website.
Step 7: Assign your menu to a location
To assign your menu to a location, go to Appearance > Menus > Manage Locations. Here, you can select which menu appears in which location on your website.
That’s it! You now know how to create a menu in WordPress. With this new menu, your website visitors will be able to easily navigate to the content they’re looking for.
Customizing the Appearance of Your Menu in WordPress
Once you’ve created your menu, you may want to customize its appearance to match the overall look and feel of your website. WordPress makes it easy to do this through the Customizer.
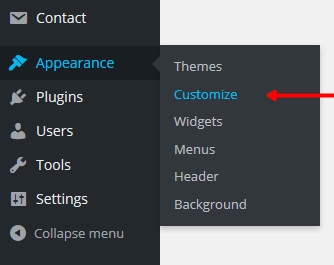
- In the WordPress dashboard, go to Appearance > Customize.

- In the Customizer, click on Menus.
- Select the menu you want to customize from the dropdown menu.
- Use the options under Menu Settings to change the font, color, background color, and other styling options for your menu.
You can also use the Additional CSS section to add custom CSS to further style your menu.
Keep in mind that the exact options available to you may vary depending on the theme you’re using. If you’re unsure about how to style your menu, consult the theme’s documentation or reach out to the theme’s support team for help.
Troubleshooting Common Issues

Even with the step-by-step instructions provided in this guide, you may still encounter some issues when creating a menu in WordPress. Here are some common problems and solutions to help you troubleshoot:
Menu not showing up
- Make sure that you have assigned your menu to a location. Go to Appearance > Menus, select the menu you want to display, and check the box next to the location where you want the menu to appear on your website.
- Ensure that your theme is compatible with WordPress menus. Some older themes or free themes may not have built-in support for menus, so you may need to find a menu plugin or switch to a newer theme.
Sub-menu items not displaying
- Make sure that your sub-menu items are properly nested under the parent menu item. Go to Appearance > Menus and drag and drop the sub-menu items to the right of the parent menu item to create the nesting.
- Some themes may have a limit to the number of sub-menu levels displayed. Check your theme’s documentation or settings to see if this is the case.
Menu not working on mobile devices
- Many responsive themes automatically hide the main navigation on smaller screens to make more room for content. Check your theme settings or documentation to see if this is the case.
- If your theme doesn’t have a built-in mobile menu, you can use a plugin like “WP Mobile Menu” to create a separate mobile-specific menu.
You may also find that some other issues you encounter may be specific to the theme you use, so it’s always a good idea to check the theme’s documentation or the theme developer’s website for support.
Creating a Mega Menu
A mega menu is a type of menu that displays a large number of options in a single dropdown. This can be a great way to organize your website’s navigation and make it easy for users to find what they’re looking for. In this section, we’ll show you how to create a mega menu in WordPress.
Before you begin, you’ll need to have a menu set up in WordPress. If you haven’t done this yet, please refer to the previous sections of this guide for instructions.

Step 1: Install a Mega Menu Plugin
The first step in creating a mega menu is to install a plugin that will allow you to do so. There are a number of different mega menu plugins available for WordPress, but some popular options include:
- Mega Main Menu: This plugin offers a wide range of customization options and is easy to use.
- UberMenu: This plugin is another popular option that offers a lot of customization options as well as support for various types of content, like images, maps, and videos.
- Max Mega Menu: This plugin is a lightweight and user-friendly option that makes it easy to create a mega menu.
Once you’ve chosen a plugin, install it on your WordPress site by going to Plugins > Add New and searching for the plugin by name.
Step 2: Configure the Mega Menu
Once the plugin is installed and activated, you’ll need to configure it to set up your mega menu. The exact steps will vary depending on the plugin you’ve chosen, but in general, you’ll need to:
- Go to the plugin’s settings page (usually found under Appearance > Menus in the WordPress dashboard).
- Configure the plugin’s settings to your liking. This may include setting the number of columns in the mega menu, choosing a layout, and more.
- Select the menu you want to use for the mega menu.
- Save your changes.
Step 3: Add Content to the Mega Menu
Once the mega menu is set up, you can begin adding content to it. The process will vary depending on the plugin you’ve chosen, but in general, you’ll need to:
- Go to the plugin’s settings page.
- Edit the menu you’ve chosen to use for the mega menu.
- Add new items to the menu or edit existing items.
- Drag and drop items to create the desired structure of the mega menu.
- Save your changes.
Step 4: Customize the Mega Menu
After you’ve added content to the mega menu, you may want to customize its appearance. The exact steps will vary depending on the plugin you’ve chosen, but in general, you’ll need to:
- Go to the plugin’s settings page.
- Choose a layout.
- Customize the colors, fonts, and other styling options.
- Save your changes.
Example of when to use a Mega Menu
Mega Menus are particularly useful for websites that have a lot of content and pages. For example, an e-commerce website with multiple categories and subcategories can benefit from a Mega Menu, it will make it easy for users to navigate and find what they’re looking for.
A Mega Menu can also be useful for websites that have a lot of pages and content organized in a hierarchical structure, like a blog with multiple categories and tags, it will make it easy for users to discover new content.
Keep in mind that Mega Menus are not always the best option, as they can be overwhelming for some users and can also cause a slower loading time on your website. It’s important to consider your website’s layout and user experience before deciding to use a Mega Menu. Additionally, make sure to test the Mega Menu on different devices to ensure it is working properly and is easy to navigate.
Conclusion
Creating a menu in WordPress is a great way to improve the user experience for your visitors and make it easier for them to find the content they’re looking for. By following the simple steps outlined in this guide, you’ll be able to create a menu that is both visually appealing and functional. Remember to be mindful of the organization and arrangement of your menu items, as this can have a big impact on the overall usability of your site.
Additionally, if you ever need to make changes to your menu in the future, WordPress makes it easy to do so. With its user-friendly interface and intuitive design, WordPress is the perfect platform for creating a professional and functional website, and adding a menu is just one of the many things you can do to enhance your site. By following this guide, you’ll have a menu that is tailored to your needs and helps your visitors find the content they are looking for, making the navigation of your website more efficient and enjoyable for them.
If you would fancy a video tutorial on WordPress menus don’t hesitate to have a look at the tutorial from the team over at Wealthy Affiliate, our top-recommended all-inclusive online business platform.
Are you interested in learning the ins and outs of WordPress from the best online business platform out there? Then our review of Wealthy Affiliate is a must read.
And while you’re at it, be sure to read my lazy bum to online entrepreneur story.
I hope you found today’s tutorial on how to create menus in WordPress helpful. If you have any questions or comments please leave them in the comment section below. Also, don’t forget to share on social media and follow our pages (social icons in the header) for more awesome content.
Tony,


